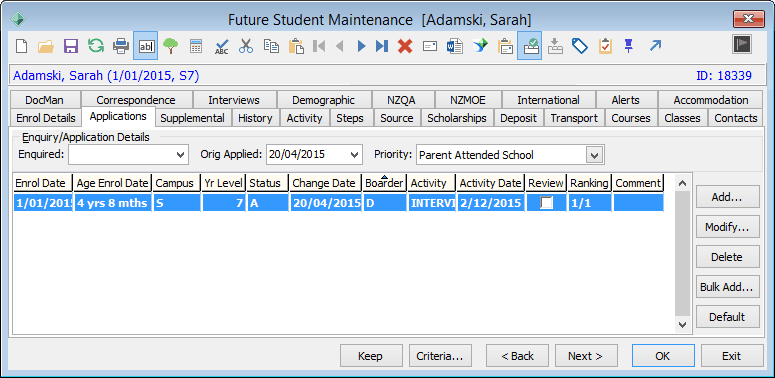
Use the Applications tab to view and maintain details about enrolment applications.
The applications are based on their order of entry into the system within date. The default application, that is, the applicant's first choice, is displayed in bold.
| Expand | ||
|---|---|---|
| ||
To open the Applications tab:
|
Future Student Maintenance - Applications tab key fields and buttons
Enquiry/Application Details area fields
Field | Description |
|---|---|
Enquired | Date of the first enquiry for enrolment of the student. |
Orig Applied | Date that the first application was received for enrolment. |
Priority | Priority category that the application has been assigned to. |
Grid area fields
Field | Description | |||||||||
|---|---|---|---|---|---|---|---|---|---|---|
Category | Category for the application. | |||||||||
Enrolment Date | Date the future student has applied to enrol at the campus starting at the specified year level. | |||||||||
Age at Enrolment | Student's age at the enrolment date of the application. This is calculated from the:
| |||||||||
Campus | Future student's campus. | |||||||||
Year Level | Future student's year level. | Field | Description||||||||
| Status | Status of the future student's application. | A - Application made. | D - Deferred. |
| F - Finalised. | O - Place Offered. |
| W - Waitlisted. | X - Cancelled by the applicant. | Note: Use the luFutureStatus lookup table to maintain entries. See the luFutureStatus lookup table in the System maintenance manual. Tip: You can create mail merge letters using the crspFutureStatusChangePrint stored procedure. See Printing mail merge letters using an existing document in the Extracting data manual.The luFutureStatus table is linked to the luFutureStatusMerge lookup table using its MergeCode. When a status is changed, its MergeCode is also changed as well. Any applications with this MergeCode are selected by the stored procedure. |
| Status Changed | Date the application was last updated. For example, the application may have been updated because the:
| |||||||||
| Boarder | Boarding status of the application. | |||||||||
| Activity | Activity associated with the application. | |||||||||
| Activity Date | Date of the associated activity. | |||||||||
| Review | Mark the record for future review or follow up. | |||||||||
| Ranking | Ranking applied to this application. See How ranking works. | |||||||||
| Application date | Date the application was created. | |||||||||
| Comment | Any comments on the applications. |
Buttons
Button | Description | |
|---|---|---|
Create an enrolment application. | ||
Modify the highlighted enrolment application. | ||
Delete the highlighted enrolment application.
| Button||
Description | Create future student applications in bulk. | |
| Make the highlighted application the applicant's first choice. | ||
View the highlighted enrolment application. Note: You can only view enrolment applications submitted using the Online application portal. For information about building application forms and configuring the Online application portal, see Online application portal in the Synweb Online Form Builder manual. |


.gif)
.gif)

.gif)

.gif)
.gif)

.gif)