Versions Compared

Key

  • This line was added.
  • This line was removed.
  • Formatting was changed.

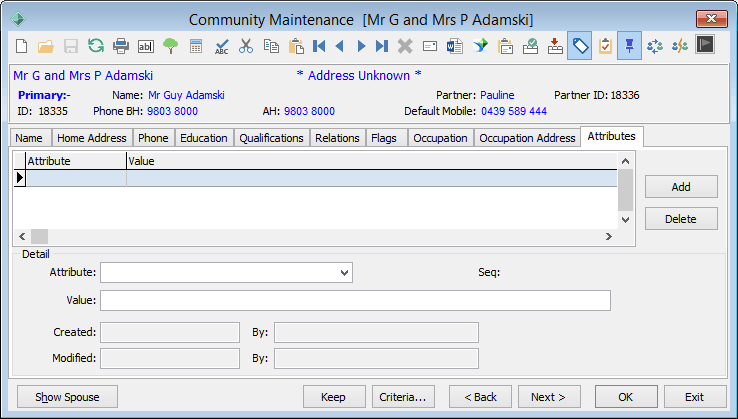
Use the Attributes tab to view and update attributes for the community member.

Expand
titleOpening the Attributes tab

To open the Attributes tab:

  1. Select Module > Community Maintenance from the main menu.
    The Set Community Search Criteria window is displayed.

    Tip:
    You can also access the Set Community Search Criteria window by clicking
    Image Removed Image Added.

  2. Search for the community member. See Searching for community members (on page ).
    The Constits tab of the Community Maintenance window is displayed.
  3. Click the Attributes tab.
    The Attributes tab of the Community Maintenance window is displayed.
    Image RemovedImage Added


Community Maintenance - Attributes tab fields and buttons
Fields
The fields in the grid area correspond with those in the Detail area.

Field

Description

Attribute

Attribute that applies to the community member.

Note
: The list of attributes used at your organisation is set in the luCommunityAttributes lookup table. See luCommunityAttributes lookup table in the System maintenance manual.


Note: You can also sort the community attributes by the sort order defined for the attribute in Configuration File Maintenance. See Maintaining configuration files in the System maintenance manual.

Value

Value that applies to the attribute for the community member.

Buttons

Image RemovedImage Added
  • Select an Attribute from the drop-down list.
  • Type a value for the attribute in the Value field.
  • Image RemovedClick Image Removed Image Added
  • Click Image Added.
  • Button

    Description

    Image RemovedImage Added

    To add a new attribute record for the community member:

    1. Click Image Removed Image Added.
      A new record is added in the grid area (denoted with an asterisk).
    Anchor
    O_15901O_15901

    Image RemovedImage Added

    To delete an existing attribute from a community member:

    1. Select the attribute that you want to delete.
    2. Click Image Removed Image Added.
    3. The following confirmation dialog is displayed.
    Anchor
    O_15905O_15905